Saddle Selection
Rarely do bicycle fitting articles mention saddle selection. Reality: this should be the first step before making any adjustment to the seat height, tilt, or fore/aft position. Riding with the wrong saddle can compromise your comfort and ideal cycling position dramatically.
As simple as it sounds, the best way to find the most comfortable bike seat is to sit on it. The problem lies in the fact that switching saddles is both time-consuming and difficult. Changing a saddle can take up to 15 minutes per seat which means most people select a seat by pressing a finger into it to test its firmness or softness. Another option is simply choosing a saddle based on advertisements. Some saddle manufacturers have done a nice job with their design and a fabulous job with their marketing. Unfortunately, this still doesn’t help you procure the ideal saddle. Fortunately, we solved this problem. At BikeFit we built a saddle fitting tool called the SwitchIt™ that quickly and easily allows you to test as many saddles as you’d like by sitting on them.
Not all shops carry the SwitchIt so you’ll need to ask for it or find another bike shop that does. When you find a shop with a SwitchIt, try to set the position on their sizing bike or stationary bike that has it mounted it to a similar position as your triathlon bike. Try as many saddles as you like until you find the one that fits best before you make your purchase. It may come as a surprise that the seat you currently ride is not the best saddle for you. Let your tush be the judge!
Saddle Selection Misnomer
Beware of other ways a bicycle dealer may guide you with saddle fitting and saddle choices. Some bike shops may have you sit on a device that takes an impression of the width of your sit bones. If this device actually works, the best information it “suggests” is how wide or narrow of a saddle you “might” like. Unfortunately, we can share with you story after story where this device does not provide information for a comfortable saddle choice.


As mentioned, the incorrect saddle can compromise your position on the bike and, of course, feel uncomfortable. As you try to find the right saddle, keep an open mind. Some shops may start you down a saddle choice path by pointing out saddles designed for a triathlon or for men or women specifically. However, some triathletes find a road saddle more comfortable and some men may find women’s specific saddles more comfortable or the other way around. Either way, please be ready and willing to try ALL kinds of saddles.
Saddle Cutouts
Are seats with a cutout good? It seems that in the past some seat manufacturers added a cutout to make up for their less-than-ideal saddle design. Many saddles did not offer the ideal support in the right area. A good-fitting saddle may not need a cutout if the support is in the ideal area for you. Where is the ideal area? It varies from person to person. In general, for most of us (male or female) it means not too much pressure in the front or in the center of the saddle. For some, sitting slightly off to one side may be the answer. Bike fitter extraordinaire John Cobb often recommends positioning the nose of the saddle to one side.

Ultimately a cutout seat may prove the most comfortable, but don’t discount those saddles without a cutout before trying them first. You may surprise yourself as to which feels best.
Saddle Tilt
Is a level saddle the best position for you? It may be ideal for some but probably not for every triathlete. Numerous people tilt the saddle nose down thinking it will increase comfort. If you must tilt the nose down more than a few degrees, you may not have the right saddle and/or the overall bike fit is likely too far off. Too much downward tilt usually results in your pelvis sliding forward. This leads to hand, elbow, forearm, triceps and shoulder discomfort or pain. You may find yourself pushing your pelvis back from the bars several times in a ride. Some people will also feel like they are pedaling more with the tops of their quads (just above the knee). While not as common, some saddles feel better with a slightly upward tilting nose. The best adjustment for your saddle really depends on you and on the saddle itself. So don’t get hung up by someone saying it is “supposed to level” or “tilt” this way or that way. Rather, adjust to what feels best.
Saddle Height
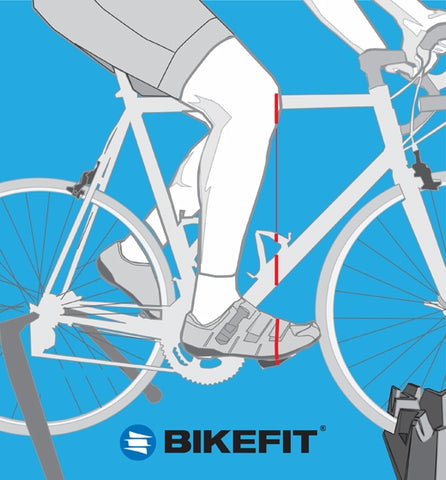
The starting point for most do-it-yourself bike fits is typically saddle height. Sit on the saddle with one leg hanging free and your pelvis level—not one hip tilted higher or lower. Your hanging leg’s heel should just scrape or touch the pedal when the pedal is at the very bottom (6 o’clock). Once you slide your foot back to bring the ball of your foot to the center of the pedal you should have a slight bend in your knee.

In our experience, the properly bent knee resides between 27 and 37 degrees of flexion from a straight leg. Typically, most people have greater than 30 degrees of knee bend at the bottom of the pedal stroke. The Empfield – F.I.S.T guide suggests an even lower saddle height range. Collectively we feel that you will almost never see someone needing to be taller than our ranges. Occasionally you might rarely see someone lower. If your hips rock a little when you pedal, lower the saddle a couple millimeters and test again. Repeat as necessary until you eliminate this rocking. You may be someone that just rocks. Don’t feel like the Lone Ranger; you are not alone. At this point, you may want to consider shorter cranks. If you are on a fit bike with adjustable cranks, shorten them and observe the changes.
While there are formulas that take into account your inseam measurement, they generally do not produce any better result than this heel scrape method.
We recommend using a Goniometer to accurately measure knee bend. Take a look at the goniometer checking knee flexion or the bend in the knee at the bottom of the stroke:


Saddle Height Accuracy
Can saddle height be set to the exact millimeter? Saddle height is never the same even for the same person. What do we mean by this? What happens if they wear a different pair of cycling shorts? That precise measurement is now not so precise. Does the “millimeter measurement” account for the wear and tear of a saddle that has been ridden for a long period of time? What if the rider feels tight one day, rested the next day, or they wear additional clothing to accommodate for cold weather? The list is nearly endless. Bottom line: the millimeter adjustment is not as important as you might believe.
Saddle Fore/Aft Position
For years common thinking for saddle fore-aft positioning was determined by the knee over pedal spindle (KOPS) positioning. The KOPS fit process: place one foot forward (3 o’clock) with your crank arms parallel to the ground and then ensure that the forward knee cap is just over the center of the pedal (see picture below). For some riders, this method will work well enough for a road or mountain bike fit but that is a “maybe” at best.
Many people use a plumb bob for this measurement (we did at one time). We found a laser or the BikeFit Pro App to be easier and far more precise. While the right leg in the photo above is closest, the rider can spin the other leg forward and check the fore/aft on the far leg as well without moving the laser. We also refer to this as a “hands-free” technique. With a laser, the fitter is able to make an adjustment or simply step back and take a look. This is not possible with a weighted string hanging from the knee. Today we use this more to see if one knee is further forward than the other but NOT to check the actual saddle fore-aft position (especially on a triathlon bike fit).
Unlike road or mountain bikes, KOPS is NOT a starting point for triathlon bike fit. The modern method we subscribe to is a modified (but fairly close) Dan Empfield or Slowtwich approach. As mentioned above, my early influences come separate of Dan, having lived at the Olympic Training Center (OTC) in Colorado Springs when funny bikes were first being made. I was also influenced by working with aerodynamic guru John Cobb. We put a lot of John’s information in our first bicycle fitting manual, possibly the first fitting manual on tri bike fit. It is not that tri bike fitting was not talked about, but finding a manual for one was next to impossible.

UCI Exceptions: Saddle Fore-Aft
There is an exception to the fore-aft saddle position for time trial bike fitting or for any bike that needs to be UCI legal. Because of this, it is actually easier to fit a time trial bike than it is a triathlon bike–one of the driving aspects or fit parameters is automatically set for you. We are not saying this is a good thing but rather an easier thing.

For USAC or UCI races or time trials, set the saddle height and put the nose of the saddle 5cm behind the BB and “Voila” you have your seat position for a time-trial bike. There are other parameters to follow. Just to make things more complicated, the UCI has a jig and your bike needs to be set up within the guideline of this jig (or template). This resembles a template for a stock car.
To see what this jig looks like, here is a bike that is set up illegally for UCI/USAC racing.

Additionally, not shown in this illustration are several angles and positions of the cyclist on the bike that must adhere to UCI guidelines.
