What’s the Difference Between Cleat Rotation and Cleat Float?


Illustration that shows cleat rotation on a cycling shoe and the impact on a rider's position on the pedal

Over the years in countless bike shops, I’ve heard the following disturbing phrases uttered to cyclists: “Get these cleats.  You don’t have anything to worry about.” “These cleats have float you won’t need a bike fit.” “Get these cleats with float and they’ll take care of everything.” Unfortunately, phrases and versions of these sometimes false reassuring comments are shared in not only bike shops but in forums, local rides and social media groups.  Consequently, it’s time to set the record straight and dive deep into the cleat adjustment handbook. Today we’re going to tackle the following:

  • Define cleat rotation and float
  • Review popular cleat float types and limits
  • Overview why both are needed and some suggestions
SPOILER ALERT: Below is the 5-minute version of the entire article!  If you’re more the visual type, this is your jam.

What is Cleat Rotation?

Cleat rotation is the physical movement of the cleat either clockwise or counter-clockwise to allow the foot to rotate in alignment with its natural orientation.  Basically, allow the foot to point in the direction it would like to point.  Generally speaking, the rotation of the cleat is similar on and off the bike.  For many professional bike fitters, an off-the-bike assessment can provide an indication of the rotation required.  For example, if you naturally walk with your toes out, you’ll likely require a similar setup on the bike.

Illustration showing angles of foot rotation
For 3-hole cleat users of Look or Shimano road, if you have a “toe-out” natural gait, your setup will look similar to this photo below (bottom-right).
Illustration depicting cycling shoes with and without cleat rotation.
On the other hand, you may walk with your toes out but your cleats are set up what we refer to as “pigeon-toed” with your toes facing inward toward the bike.  This can potentially cause significant discomfort or even pain, especially after thousands of pedal strokes. 
Illustration showing cleat rotation with pigeon toe stance.
To the original point in the article and to keep you on your toes, the logical question is, “Doesn’t cleat float solve this issue of toe-in or toe-out without requiring cleat adjustment?” The short answer is not always.  Like any other bike adjustment, some people contain the innate and amazing trait of adjustability whereby the individual adapts to position changes.  In most cases, the float is impacted by the rotation.  If a cleat is not rotated properly, the foot may not be able to achieve the required, rider-dependent, foot position resulting in pain, discomfort, or injury.

What is Cleat Float?

Cleat float or pedal float is when the cleat rotates freely inward or outward while clipped into the pedal.  The movement is categorized in different cleats by a number of degrees.  For some companies like Shimano and Look, you can purchase cleats with varying levels of float or “fixed” cleats which meaning they are devoid of float.  Float allows a person who toes in or out move the foot to a more natural position during the pedal stroke.  Yet, float doesn’t necessarily solve all issues or allow enough range to meet the specific needs of an individual.  More on that to come!

Shimano Cleat Float: 6 Degree, 2 Degree, and 0 Degree

Sam Richardson, Level 2 BikeFit Pro Fitter, from Bicycles NYC describes Shimano cleat float levels below:

Sam expresses some significant warnings about less float requiring a bike fitting. While more float is safer because it allows increased space for the foot to function in a natural position and also may forgive cleat placement of a slightly less accurate rotation adjustment, float does replace a full bike fit (using the 5 main adjustments of the foot/pedal interface). An interesting note is the amount of float may be somewhat deceiving. Below is a diagram noting the specifics of Shimano float.

Illustration that shows the specifics of Shimano float - 6 degrees and 2 degrees of float

Image created by bike fitter Chad McNeese of The Spoke Shop in Billings, MT

Contrary to some cycling lore, 6 degrees of float does not mean 6 on either side but 6 degrees total (3 in and 3 out).  In addition, as you can see from Chad’s drawings the amount of movement affects the forefoot more on the 6-degree than the 2-degree.  This is due to the change in the pivot point between both and also due to the amount of float provided.  Shimano discusses this at length on their site as well.  This proves how increased float can provide a larger margin for error in natural foot movement.
Look Cleat Float
Look cleats provide an increased range with their 9 and 4.5-degree model but still sells a 0-degree.  This again means for example in the 9-degree model that the foot can move up to 4.5 degrees on each side–not 9.
Photo of 3 LOOK cleats with various degrees of rotation.
Photo Credit: Tri Sports Lounge
Speedplay Cleat Float
Speedplay provides the most amount of float (7.5 degrees in each direction for a total of 15 degrees) and it’s also adjustable.  This higher level of float is imperative for Speedplay pedals since they do not allow for cleat rotation.  Therefore when adjusting Speedplay cleats, it’s important to be aware of both the “heel-in” and “heel-out” settings as you can adjust both via the limit screws.  Depending on the orientation of your feet, you may not be to utilize the full 15 degrees in each direction.  Much like the drawings shown earlier in rotation, if the float is left open (maximum in both directions), the foot will travel where it wants to go but there’s a limit depending on the individual.
Bike fitter holds screwdriver near the cleats on a cycling shoe
Digital illustration of a screwdriver working on a cleat on a cycling shoe
MTB, SPD and 2-hole Cleat Float
2-hole cleats like SPD (Shimano Precision Dynamics), Crank Brothers or Time Atac contain an area of float prior to disengagement.  Each type provides different levels of float but again be cognizant of the total amount of float advertised is split between heel-in and heel-out.  For example, the Crank Brothers cleats below show the range of their 6-degree float cleats.
Animation showing rotation with various levels of float

Why is Cleat Rotation Important if Cleat Float exists?

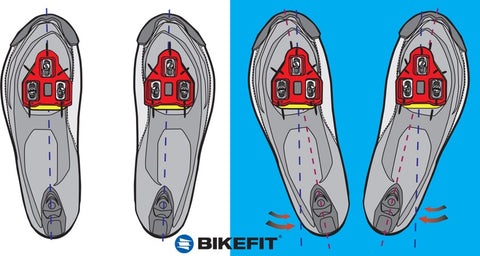
Yes, I’ve been alluding to this throughout the article so here’s the point.  As I pointed out in the video, just because there’s lateral float, does not mean a person won’t still experience pain or issues.  If a cleat is not properly rotated, then it’s possible that the float will not allow enough foot rotation to achieve optimal foot position.  For example, if you are a natural toe-out walker and your cleats are rotated inward, float alone is unlikely to solve the issue (especially with 3-hole and 2-hole cleats).

Illustration highlighting where knee paid can occur

If this is the case, you’ll likely experience knee pain while riding most likely on the inside of the knee but more toward the back (see image).  In order to avoid this pain, BikeFit professionals are trained in the process of examining the cleat from a rear position and testing rotation to find the best rotational position.  While this process is outlined more specifically in our BikeFit manual and courses, it’s imperative to recognize that float and rotation both need to be taken into account during proper cleat setup and alignment. If you’re curious about the process that trained foot/pedal professionals use to assess proper cleat rotation, here are a few pictures of fitters performing the task.

A bike fitter examines the rotation on a cyclists heel 
A bike fitter adjusts a cyclists heel while they are being fitted on a bike.
I’d love to give you the easy answer to purchase a cleat with float and be done with it, but unfortunately, I’ve seen too many uncomfortable cyclists over the years with float who require proper rotation as well. Enjoy your ride! -Paul and Damon

Interested in expanding your knowledge? Bike retailers and shop employees with a QBP account have access to educational resources within the U of Q Training Library. Get started now.
Back to blog